Wednesday, November 30, 2011
and so the big beads continue........
Sanding, sanding and even more sanding to create the perfect finish on these beads - as I mentioned the finish can either make or break these beads.
A little lotion helps "bring back the black".
The finished piece - yay!!!!
Donna Kato Big Beads
So onto our first project - being the big beads.
First we created the bullseye cane which will be used for the bead caps and then reduced and used on the central band of the bead.
You can see in this pic we've used the bullseye cane and the zipper cane on either end of the bead to create beautiful bead caps.
This is Donna's gorgeous bead - beautifully symetrical. You can see she's used a green base for her bead - yummy.
......and this is my bead (quite wonky too I might add) but pretty happy with it.
keep watching for the next installment of big beads......
Tuesday, November 29, 2011
My First Day with Donna
So on my very first day with Donna we decided to have a go at creating some luscious "big beads". The techniques have always amazed me and so to learn how to create something with such a great finish really appealed. I think too often we forget about the "finish" of the piece, (this can more often than not, either make or break your creation).
The beginning of the big beads were the zipper cane.
Creating the striped stack.
Colour mixing to create a gorgeous lime green.
The zipper cane complete.
Yummy spirals.
A feast of yummy spirals.
The beginning of the big beads were the zipper cane.
Creating the striped stack.
Colour mixing to create a gorgeous lime green.
The zipper cane complete.
Yummy spirals.
A feast of yummy spirals.
Monday, November 28, 2011
and Finally it's Time To Clay Play with Donna......woohoo!!
......and so after a very long day travelling, I finally make it to the picturesque town of Florissant, Colorado (not that I can see anything cause it's night time!), which will be the last stop for this incredible journey. I wake in the morning to find myself surrounded by snow, pine trees and the most beautiful mountains I've ever seen. We are 9000 ft above sea level and guess what......no flies!!!!
Check out some the pics I took.
Sunday, November 27, 2011
....And The Finished Cane.......
Kokopeli Cane with Kathi
So this is the day I finally get to meet our mate Kathi from Bakersfield. Kathi and I have known each other for about 3 years I guess through Aussiepolyclayers and I always knew that we'd meet one day in real life....and how great it was to meet Kathi.......finally. We played together making one of my favourite canes.
The beginning of the cane using some turquoise that Kathi had mixed in the food processor.
Gradually progressing.........
......and progressing even more...........
Keep an eye out for the finished cane - wooho! love it!
Saturday, November 26, 2011
Massive Thanks To Rachel
You know, I've been thanking everyone overseas for making this trip such a memorable one for me and the one person I should have thanked above all else is Rachel. Rachel worked tirelessly, in her own time, to put this trip together and I would certainly not have done this if it hadn't been for her. I'm so thankful for her passion and dedication and am in total awe of her. Rachel you're my hero and I just wish you could have been with me for the whole journey. I'm so looking forward to planning and putting into place the next step in this amazing project - most of all looking forward to spending time with you and working with you again.
You should know now that I'm home but the blog continues.........just wanted to get this one in here now.
Final Pics from Clay Play with Christi
I had the best time playing with clay with Christi. I learnt alot of different bits and pieces that I hadn't learnt in my travels so far so I'm getting such a wide variety of different techniques - it's fantastic.
I think this pics on it's side actually but you get the idea. Some great techniques learnt in this piece. I love the way Christi smoodges the clay into a base piece - awesome!!! This piece is not finished yet - will be doing that at home.
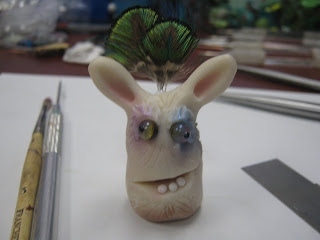
This is my little gremlin guy (I forget what Christi calls them) but they are so cute and really easy to do. I can see lots of potential for this little guy.
While working in the studio with Christi she very kindly let me use her tools and I have to admit, if you don't have these little babies then you seriously need to think about getting them. They are simply awesome. They have letters stamped on them which I tired to get in this pic but didn't but I do remember one has the letters GHI on it - guess what this stands for - "Gotta Have It"!!!! Love it. The others have names too - better check out her website for more info on these.
I had a great time with Christi (as you can see). Thanks so much for everything - it was awesome.
Playing in Christi's Studio
I have to admit being in Christ's studio was a real treat for me. All four walls were covered with shelving and on all shelves were boxes, bags, jars, containers, tins..........filled to the brim with goodies. Oh she had some goodies on those shelves. My jaw hit the floor when I walked in for the very first time. With Christi's permision she allowed me to take a couple of pics of how she organises her "stuff". Christi sure has some beautiful "stuff".
This is the table where we worked and the thing I loved about this was the way Christi organises her clay. You can see the coloured clay on the table?....well she has glass containers with lids and in each one has all the shades of blue clay, then one with green clay, brown and so on. She simply grabs from the containers and away she goes. It was fantastic to see her work.
One of Christi's awesome pieces on one of her many shelves. Freaking gorgeous!!!
Not a very good pic this one but there was simply treasures to be found everywhere. No matter where I looked I saw something exciting. It was soooooooooo awesome!!
The is the very awesomely organised mica powder tray and glitter tray. These boxes were perched precariously on a small fold out table which we had to be ever so careful not to knock over. It almost went a few times but we managed the whole two days without any drama. You'll also notice some chalks on this table too. Christi works with alot of chalks and I have to say they are pretty dam good.
.......and how's these little guys - unbelievably cute. The pieces on the very right of the pic are some of Christi's work that has been cast by an artist that she knows. The are so amazing in real life. I'm pretty sure she has them for sale so might be worthwhile checking it out.
Friday, November 25, 2011
More Fun Times With Christi
Fun, Fun and More Fun With Christ
So after the chaos of Las Vegas I found myself on a lovely bus with a great bus driver who took me all the way to Lancaster in California. He showed me all sorts of great things on the way - kinda like a private tour - it was so awesome. I even managed to have a little sleep as well which was fantastic. I arrived in Lancaster to be greeted by the Christi's husband who then drove me all the way to Tehachapi. I got another tour of this part of the state and it was simply awesome. The wind farm just outside of their town was incredible. Scott dropped me off at the hotel and I settled in and then we all met up to go out for dinner. What a brilliant start to this leg of the journey.
Christi came and picked me up the next day and took me to her studio and that's where the fun began. It took me a while to look around there was just so much yummy stuff......and then the claying began. I took heaps of pics so will show you a few bits and pieces over the next couple of days.
Christi takes a great pic.
Look what I made - I learnt some amazing techniques from Christi - I'm just so grateful. Gobsmackingly gorgeous stuff.
........and look at this little mini scene on a ring.........awwwwwwwwww!!!
More great pics to follow.......stay tuned..........
Thursday, November 24, 2011
What an Amazing Bunch of Teachers
Some New Friends
Well Clay Carnival is over. What an awesome experience it turned out to be - well worthwhile all the airline dramas that happened at the beginning of the trip. I'm sad Rachel couldn't be with me - I really miss her. She was with me in my heart.
I made some wonderful friends and had an absolutely brilliant time. Thanks so much to the ladies in my group - you were all fantastic and made the event for me even more unforgetable. I did take pics of them all but none turned out as I had my super macro setting turned on on my camera duh!!!
Michelle (from Australia).
Chieko from Japan.
Karen from Cypress.
Sandee from Australia.
Wednesday, November 23, 2011
Look Who I Met!!!!!!
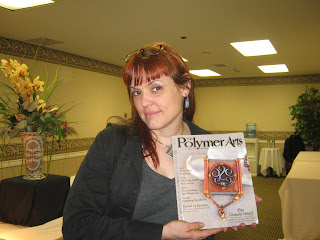
and who do you think this gorgeous girls is..............yes, the one and only Sage Bray (mastermind behind the newest polymer mag on the block). Sage is awesome and was so cool to meet her. I first met Sage on the Polymer Clay Artists Guild of Etsy and somehow knew that one day I would meet her. Sage was going to be near Las Vegas at the time of the Clay Carnival so called in to take a couple of workshops and do a story on the event. Yay!!! it was so great to met her finally.
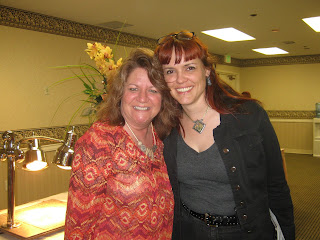
Sage and Kim - great pic ladies - you both look so beautiful.
The Sylvie Cutter!!
Would you have a look at this gorgeous little thing. During Sylvie's class we had to cut small round holes in the middle of our discs before baking. Sylvie came up with this great way of doing it that's soooooo easy - so now we won't have to dig the clay out of our straws every time we cut a hole. She's placed a small straw over a toothpic and then as you cut your clay with the straw you can then push the teeny bit of clay out with the toothpic - yay! We had lots of fun planning on new versions of the Sylvie cutter during the class. Love it.
s
Subscribe to:
Posts (Atom)